Monday, June 6, 2016

Check windows OS disk allocation unit size

fsutil fsinfo ntfsinfo n:


Using disk part:

Microsoft Windows [Version 6.1.7601]
Copyright (c) 2009 Microsoft Corporation.  All rights reserved.

C:\Windows\system32>chkdsk
The type of the file system is NTFS.

WARNING!  F parameter not specified.
Running CHKDSK in read-only mode.

CHKDSK is verifying files (stage 1 of 3)...
  128512 file records processed.
File verification completed.
  448 large file records processed.
  0 bad file records processed.
  0 EA records processed.
  908 reparse records processed.
CHKDSK is verifying indexes (stage 2 of 3)...
25 percent complete. (158832 of 190012 index entries processed)
C:\Windows\system32>fsutil
---- Commands Supported ----

8dot3name       8dot3name managment
behavior        Control file system behavior
dirty           Manage volume dirty bit
file            File specific commands
fsinfo          File system information
hardlink        Hardlink management
objectid        Object ID management
quota           Quota management
repair          Self healing management
reparsepoint    Reparse point management
resource        Transactional Resource Manager management
sparse          Sparse file control
transaction     Transaction management
usn             USN management
volume          Volume management

C:\Windows\system32>fsutil sfinfo ntfs info n:
sfinfo is an invalid parameter.
---- Commands Supported ----

8dot3name       8dot3name managment
behavior        Control file system behavior
dirty           Manage volume dirty bit
file            File specific commands
fsinfo          File system information
hardlink        Hardlink management
objectid        Object ID management
quota           Quota management
repair          Self healing management
reparsepoint    Reparse point management
resource        Transactional Resource Manager management
sparse          Sparse file control
transaction     Transaction management
usn             USN management
volume          Volume management

C:\Windows\system32>futil sfinfo ntfs info n:
'futil' is not recognized as an internal or external command,
operable program or batch file.

C:\Windows\system32>futil fsinfo ntfs info n:
'futil' is not recognized as an internal or external command,
operable program or batch file.

C:\Windows\system32>futil fsinfo ntfsinfo n:
'futil' is not recognized as an internal or external command,
operable program or batch file.

C:\Windows\system32>fsutil fsinfo ntfsinfo n:
NTFS Volume Serial Number :       0xe648bffb48bfc897
Version :                         3.1
Number Sectors :                  0x00000001fffbefff
Total Clusters :                  0x000000003fff7dff
Free Clusters  :                  0x000000000bfe5e8f
Total Reserved :                  0x0000000000000000
Bytes Per Sector  :               512
Bytes Per Physical Sector :       <Not Supported>
Bytes Per Cluster :               4096
Bytes Per FileRecord Segment    : 1024
Clusters Per FileRecord Segment : 0
Mft Valid Data Length :           0x0000000000f80000
Mft Start Lcn  :                  0x00000000000c0000
Mft2 Start Lcn :                  0x0000000000000002
Mft Zone Start :                  0x00000000000c0f80
Mft Zone End   :                  0x00000000000cc840
RM Identifier:        DF6C6C0A-D45A-11E2-85FB-3C4A92ED2920

C:\Windows\system32>diskpart list

Microsoft DiskPart version 6.1.7601
Copyright (C) 1999-2008 Microsoft Corporation.
On computer: PBTPSQL24

DiskPart was unable to process the parameters.
Use 'diskpart /?' for more information.

C:\Windows\system32>diskpart

Microsoft DiskPart version 6.1.7601
Copyright (C) 1999-2008 Microsoft Corporation.
On computer: PBTPSQL24

DISKPART> list

Microsoft DiskPart version 6.1.7601

DISK        - Display a list of disks. For example, LIST DISK.
PARTITION   - Display a list of partitions on the selected disk.
              For example, LIST PARTITION.
VOLUME      - Display a list of volumes. For example, LIST VOLUME.
VDISK       - Displays a list of virtual disks.

DISKPART> list volumes

Microsoft DiskPart version 6.1.7601

DISK        - Display a list of disks. For example, LIST DISK.
PARTITION   - Display a list of partitions on the selected disk.
              For example, LIST PARTITION.
VOLUME      - Display a list of volumes. For example, LIST VOLUME.
VDISK       - Displays a list of virtual disks.

DISKPART> list volume

  Volume ###  Ltr  Label        Fs     Type        Size     Status     Info
  ----------  ---  -----------  -----  ----------  -------  ---------  --------
  Volume 0     C                NTFS   Partition     99 GB  Healthy    System
  Volume 1     Z                NTFS   Partition   1535 GB  Healthy
  Volume 2     L   AbsHireDB    NTFS   Partition   2047 GB  Healthy
  Volume 3     R   AbsoRptDB    NTFS   Partition    799 GB  Healthy
  Volume 4     S   AbsoRptLOGS  NTFS   Partition    501 GB  Healthy
  Volume 5     J   New Volume   NTFS   Partition     29 GB  Healthy
  Volume 6     K   New Volume   NTFS   Partition      9 GB  Healthy
  Volume 7     V   absHireDB_S  NTFS   Partition   2999 GB  Healthy
  Volume 8     T                NTFS   Partition    599 GB  Healthy
  Volume 9     U   AbsoTempDBL  NTFS   Partition    149 GB  Healthy
  Volume 10    P   AbsoTempDB   NTFS   Partition    299 GB  Healthy
  Volume 11    W   PURE         NTFS   Partition    499 GB  Healthy
  Volume 12    N   AbsoArchive  NTFS   Partition   4095 GB  Healthy
  Volume 13    X   PURE_TempDB  NTFS   Partition    299 GB  Healthy
  Volume 14    Y   Pure-H-driv  NTFS   Partition   4000 GB  Healthy
  Volume 15    H   TemporaryPu  NTFS   Partition   1535 GB  Healthy
  Volume 16    O   AbsoArchive  NTFS   Partition   1535 GB  Healthy
  Volume 17    M   Quorum       NTFS   Partition   3069 MB  Healthy
  Volume 18    Q   MSDTC        NTFS   Partition   2045 MB  Healthy
  Volume 19    E   AbsoLOGS     NTFS   Partition   1535 GB  Healthy
  Volume 20    F   AbsoDB       NTFS   Partition   2047 GB  Healthy
  Volume 21    G   MaestroDB    NTFS   Partition     49 GB  Healthy
  Volume 22    I   MaestroLOGS  NTFS   Partition   5117 MB  Healthy

DISKPART> select volume 2

Volume 2 is the selected volume.

DISKPART> filesystems

Current File System

  Type                 : NTFS
  Allocation Unit Size : 4096
  Flags : 00000000

File Systems Supported for Formatting

  Type                 : NTFS (Default)
  Allocation Unit Sizes: 512, 1024, 2048, 4096 (Default), 8192, 16K, 32K, 64K

DISKPART>

Friday, June 3, 2016

Stopping and Starting Services on vCenter Service Appliance 6 (VCSA)

Stopping and Starting Services on vCenter Service Appliance 6 (VCSA)

In my previous post I wrote about patching a VCSA box.  At the end of that patching processes a reboot (according to VMware) is an optional step.  However, in my case, the vCenter Web Services didn’t appear to have restarted correctly.  A reboot ultimately did resolve that issue for me, but it did start me thinking about how would I go about restarting VCSA services if the Web Client was down.  It turns out vCenter 6 has a new recommended way of restarting services using the Service Control command for both the VCSA and the Windows version.
As with my post on modifying NTP settings.  Restarting services can be done via two methods, the Web Client or via the console.  Method 1 is the easiest when access to the Web Client is there.  Method 2 relies on using the VCSA console when access to the Web Client doesn’t exist or is lost.k
Method 1.Restarting services via the Web Client
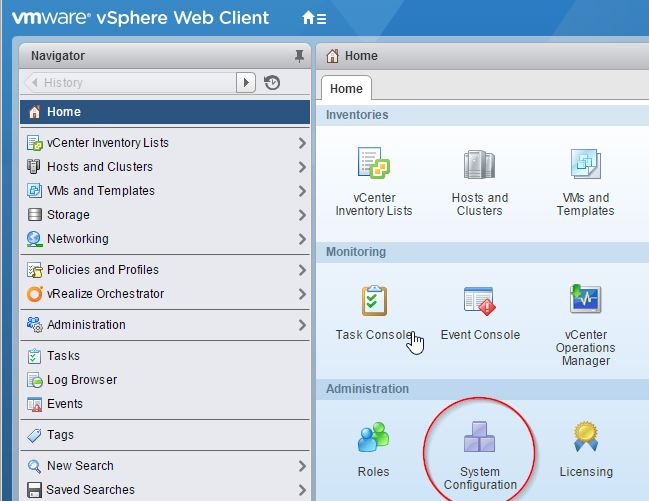
On the Home screen of the Web Client select Administration -> System Configuration
enable_ssh-000182
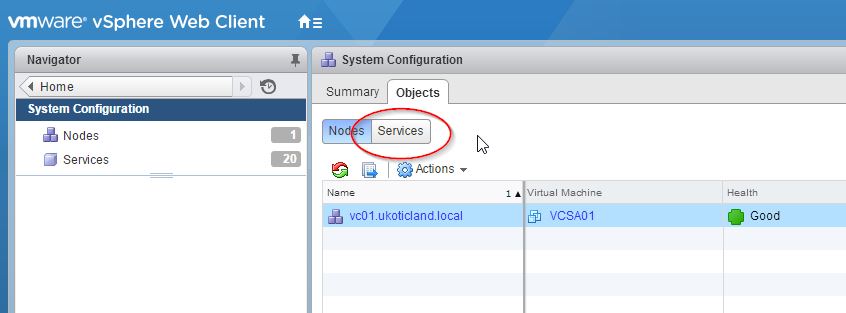
Click on the Services button on the right pane.
restart_ssh-000210
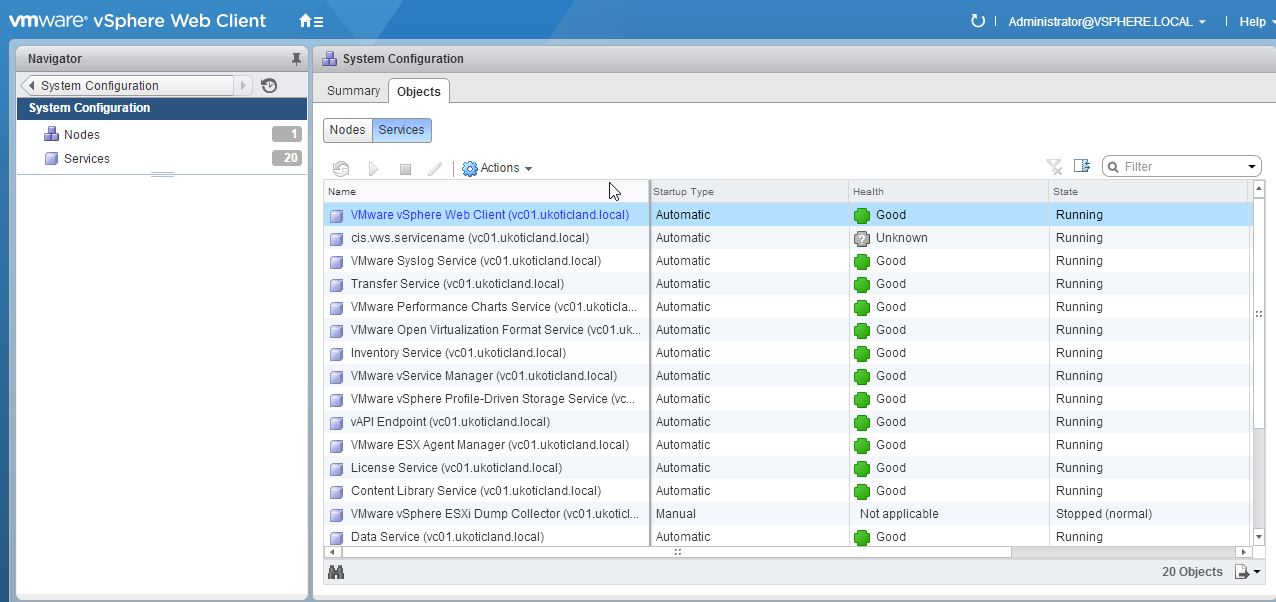
As I’ve mentioned previously finding what you want in the Web Client isn’t always intuitive as you might think.  Clicking on Services in the left pane isn’t what you want.  Rather clicking on the Services tab button on the right pane gives you a better overall status of services.
restart_ssh-000219
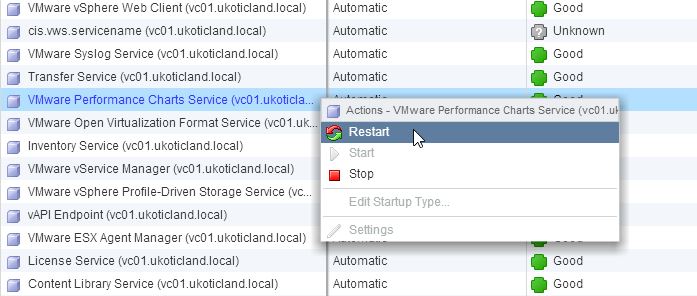
From here was can right click on any services, start, stop, restart, edit startup, and change settings on that service.  Not all services have modifiable settings via the Web Client.  This options will show up grayed out.  Once you change the state of a service you’ll find you have to refresh the page for the next state to be displayed correctly.
restart_ssh-000220
Method 2.
Restarting services via the Console
I’ll assume you already know how to enable and have access to SSH or at least the Remote Console.  If not I cover enabling SSH here.
You may come across doco that says you have to enable and enter the pi shell / bash, but this isn’t required.  Everything can be done from the VMware Command prompt
We can start of by running a command that simply lists services.
Command> service-control --list
This will list all vCenter specific services.  We can then run service-control --status for a bit of a messy view of what’s currently Running and Stopped.
Command> service-control --status
Unlike the Web Client there is no restart Service Control switches, Only start and stop.  To stop a service we run the below at the prompt.  servicename being the name of a service displayed using --list
Command> service-control --stop servicename
or to start
Command> service-control --start servicename
You can also use the --all switch in place of servicename.  I see this as a bit of a catch all.  Using this switch will only start services that have a startup type of Automatic and are currently stopped.  If a service is currently running it will be skipped.  This is a great way to get everything back up and running quickly.
Command> service-control --start --all
The reverse is true when using --all to stop services.  All services that have a startup type of Automatic and are currently running will attempt to be stopped.  Everything else will be skipped.
Command> service-control --stop --all
There are two final switches that can also be used with the --all.  --ignore and --dry-run.  The --ignore will continue to start or stop all services if an error is encountered at any point.  --dry-run will display what actions the take place with the service without actually changing anything.
Command> service-control --start --all --ignore
Command> service-control --start --all --dry-run

Thursday, June 2, 2016

Vmware SQL Best Practices 2016

Vmware SQL Best Practices 2016 


*******************************************************************

**Use Latest VMware compatibility version**

Use the latest VMware Tools and the latest VM hardware versions because this can affect the VM’s performance. For example, in vSphere 5.5 and VM hardware version 10, VMware improved Microsoft Windows VMs timekeeping which improved the Windows VMs performance. This improvement was following Microsoft’s release of the requirements to implement the Microsoft hypervisor interface. For more information about this improvement, see the Microsoft Operating System Time Sources and Virtual Hardware 10 blog post at https://blogs.vmware.com/vsphere/2013/10/microsoft-operating-system-time-sources-and-virtualhardware-10.html.

*********************************************************************


Adding Windows REG key for PVSCSI Que depth set to 254


  1. Click Start > Run, type regedit, and press Enter. The Registry Editor window opens.
  2. Navigate to this path:

    [HKEY_LOCAL_MACHINE\SYSTEM\CurrentControlSet\Services\pvscsi\Parameters\Device]

    Note: If the end of the path does not exist, create the last keys.
  3. In the Device key, create or modify a string value named DriverParameter.
  4. Set the value data of the DriverParameter to:

    "MaxQueueDepth=254"


Large-scale workloads with intensive I/O patterns might require queue depths significantly greater than Paravirtual SCSI default values (2053145)


Details

The large-scale workloads with intensive I/O patterns require adapter queue depths greater than the Paravirtual SCSI (PVSCSI) default values. Current PVSCSI queue depth default values are 64 (for device) and 254 (for adapter). You can increase PVSCSI queue depths to 254 (for device) and 1024 (for adapter) inside a Windows virtual machine or Linux virtual machine.

Solution


To resolve this issue, increase the number of pages used by the PVSCSI adapter for the request ring from the default value of 8 pages to 32 pages and set the PVSCSI device queue depth to 254:

Step 1: Adjust the queue depth for the HBAs on the ESXi host on which the Windows virtual machine runs. Complete these steps for every host to which the virtual machine is migrated:
  1. Verify which HBA module is currently loaded by running the appropriate command on the service console:

    • For QLogic:

      # esxcli system module list | grep qla
    • For Emulex:

      # esxcli system module list | grep lpfc
  2. Set the queue depth to 128 by running one of these commands:

    • For QLogic:

      # esxcli system module parameters set -p ql2xmaxqdepth=128 -m qla2xxx
    • For Emulex:

      If all Emulex cards on the host need to be updated, apply the global parameter, lpfc_lun_queue_depth.

      # esxcli system module parameters set -p lpfc0_lun_queue_depth=128 -m lpfc820

    Note: The above examples show the QLogic qla2xxx and Emulex lpfc820 modules. Use the appropriate module based on the result of the previous step.

    Also, consider these:

    • In the above commands, both ql2xmaxqdepth and lpfc0 use the lowercase letter L, and not the numeral 1.
    • The HBAs represented by ql2x and lpfc0 have their LUN queue depths set to 128.
  3. Reboot your host.
  4. Run this command to verify your changes:

    # esxcli system module parameters list -m driver

    Where driverrepresents the QLogic or Emulex adapter driver module, such as lpfc820 or qla2xxx.

    You see output similar to:

    Name Type Value Description
    -------------------------- ---- ----- --------------------------------------------------
    .....
    ql2xmaxqdepth int 128 Maximum queue depth to report for target devices.
    .....

Step 2: Increase the PVSCSI queue depth inside the Windows or Linux virtual machine, as described in the following sections. This modification increases the number of pages used by the PVSCSI adapter for the request ring to 32. It also increases the queue depth of the devices attached to the PVSCSI adapter to 254.

Note: The default number of ring pages is 8, each of which is 4 KB in size. One entry of 128 bytes is needed for a queued I/O, which means that 32 entries on a single page of 4096 bytes, resulting in 256 entries (8x32). The Windows PVSCSI driver adapter queue was hard coded in previous releases, but it can be adjusted up to the maximum of 32 pages since the versions delivered with VMware Tools in ESXi 5.5, 5.1 U1, and 5.0 U3. The Linux PVSCSI driver's number of ring pages can be a adjusted with versions prior to the Windows ones.

For a Windows virtual machine:
  1. From the command line of your Windows virtual machine, run this command:

    REG ADD HKLM\SYSTEM\CurrentControlSet\services\pvscsi\Parameters\Device /v DriverParameter /t REG_SZ /d "RequestRingPages=32,MaxQueueDepth=254"
  2. Reboot the virtual machine
  3. To verify the successful creation of registry entry:

    • Open the registry editor by running the REGEDIT command from the command line.
    • Browse to HKLM\ SYSTEM\CurrentControlSet\services\pvscsi\Parameters\Device.
    • Verify that the DriverParameter key exists with a value of RequestRingPages=32, MaxQueueDepth=254.
For a Linux virtual machine:
  1. Create a file of any name in the /etc/modprobe.d/ directory with this line:

    options vmw_pvscsi cmd_per_lun=254 ring_pages=32

    Note: For RHEL5, edit /etc/modprobe.conf with the same line. Make a new initrd for the settings to take effect. You can do this either by using mkinitrd, or by re-running vmware-config-tools.pl. Starting in version 6, RHEL uses modprobe.d.
  2. Alternatively, append these to kernel boot arguments (for example, on Red Hat Enterprise Linux edit /etc/grub.conf or on Ubuntu edit /boot/grub/grub.cfg).

    vmw_pvscsi.cmd_per_lun=254
    vmw_pvscsi.ring_pages=32
  3. Reboot the virtual machine.
  4. Verify the changed queue depth by using cat on those files:

    $ cat /sys/module/vmw_pvscsi/parameters/cmd_per_lun
    $ cat /sys/module/vmw_pvscsi/parameters/ring_pages

Speed up VMconverter by disabling the SSL

To disable SSL encryption:
  1. Take a backup of the converter-worker.xml file. By default, this file is located at:

    • Windows 7/Server 2008 and Later – C:\ProgramData\VMware\VMware vCenter Converter Standalone
    • Window Vista, XP and 2003 Server - %ALLUSERSPROFILE%\VMware\VMware vCenter Converter Standalone
    • In older Windows versions – %ALLUSERSPROFILE%\Application Data\VMware\VMware vCenter Converter Standalone
  2. Open the converter-worker.xml file using a text editor.
  3. Locate the tag pair <useSsl></useSsl>. It is located inside the <nfc> tag and has a value of true.
  4. Change the value to false.
  5. Save and close the file.
  6. Restart the VMware vCenter Converter Standalone Worker service on the machine.

Wednesday, June 1, 2016

Depreciated VMFS volumes fix

  1. Log in to SSH or Local console as root.
  2. Run these commands:

    /etc/init.d/hostd restart
    /etc/init.d/vpxa restart


Restarting the Management agents on an ESXi or ESX host (1003490)

Symptoms

  • Cannot connect ESXi/ESX to VirtualCenter/vCenter Server
  • Cannot connect directly to the ESXi/ESX host from the VMware Infrastructure Client / vSphere Client
  • Cannot stop or start a virtual machine
  • A virtual machine is shown as running in vCenter Server when it is not
  • vCenter Server displays the error:

    Virtual machine creation may fail because agent is unable to retrieve VM creation options from the host

Purpose

For troubleshooting purposes, restart the management agents on your ESX host. This article provides steps to restart the management agents ( mgmt-vmware and vmware-vpxa) directly on ESXi/ESX.

This article applies to ESXi/ESX 3.x, 4.x, 5.0, 5.1, 5.5 and 6.0.

Warning: If LACP is configured on the VSAN network, do not restart management agents on ESXi hosts running Virtual SAN. File a support request with VMware Support and note this Knowledge Base article ID (1003490) in the problem description. For more information, see How to Submit a Support Request.

Caution: Restarting the management agents may impact any tasks that are running on the ESXi/ESX host at the time of the restart. For more information about identifying tasks running on an ESXi/ESX host, see Collecting information about tasks in VMware ESX and ESXi (1013003).

For more information, see Using ESXi Shell in ESXi 5.x (2004746).

Resolution

Restarting the Management agents on ESXi

To restart the management agents on ESXi:
From the Direct Console User Interface (DCUI):
  1. Connect to the console of your ESXi host.
  2. Press F2 to customize the system.
  3. Log in as root.
  4. Use the Up/Down arrows to navigate to Restart Management Agents.

    Note: In ESXi 4.1 and ESXi 5.0, 5.1, 5.5 and 6.0 this option is available under Troubleshooting Options.
  5. Press Enter.
  6. Press F11 to restart the services.
  7. When the service restarts, press Enter.
  8. Press Esc to log out of the system.

From the Local Console or SSH:
  1. Log in to SSH or Local console as root.
  2. Run these commands:

    /etc/init.d/hostd restart
    /etc/init.d/vpxa restart


    Note: In ESXi 4.x, run this command to restart the vpxa agent:

    service vmware-vpxa restart

    Alternatively:
    • To reset the management network on a specific VMkernel interface, by default vmk0, run the command:

      esxcli network ip interface set -e false -i vmk0; esxcli network ip interface set -e true -i vmk0

      Note: Using a semicolon (;) between the two commands ensures the VMkernel interface is disabled and then re-enabled in succession. If the management interface is not running on vmk0, change the above command according to the VMkernel interface used.
    • To restart all management agents on the host, run the command:

      services.sh restart
    Caution:
    • Check if LACP is enabled on DVS for version 5.x and greater. For more information, see vSphere 5.0 Networking Guide.
    • If LACP is not configured, the services.sh script can be safely executed.
    • If LACP is enabled and configured, do not restart management services using services.sh script. Instead restart independent services using the /etc/init.d/module restart command.
    • If the issue is not resolved, and you are restarting all the services that are a part of the services.sh script, take a downtime before proceeding to the script.
  • Note: For more information about restarting the management service on an ESXi host, see Service mgmt-vmware restart may not restart hostd in ESX/ESXi (1005566).

Restarting the Management agents on ESX

To restart the management agents on an ESX host:
  1. Log in to your ESX host as root from either an SSH session or directly from the console.
  2. Run this command:

    service mgmt-vmware restart

    Caution: Ensure Automatic Startup/Shutdown of virtual machines is disabled before running this command or you risk rebooting the virtual machines. For more information, see Restarting hostd (mgmt-vmware) on ESX hosts restarts hosted virtual machines where virtual machine Startup/Shutdown is enabled (1003312) and Determining whether virtual machines are configured to autostart (1000163).
  3. Press Enter.
  4. Run this command:

    service vmware-vpxa restart
  5. Press Enter.
  6. Type logout and press Enter to disconnect from the ESX host.

    If this process is successful, you see output similar to:

    [root@server]# service mgmt-vmware restart
    Stopping VMware ESX Server Management services:
    VMware ESX Server Host Agent Watchdog [ OK ]
    VMware ESX Server Host Agent [ OK ]
    Starting VMware ESX Server Management services:
    VMware ESX Server Host Agent (background) [ OK ]
    Availability report startup (background) [ OK ]
    [root@server]# service vmware-vpxa restart
    Stopping vmware-vpxa: [ OK ]
    Starting vmware-vpxa: [ OK ]
    [root@server]#


    Note: If there are failures listed:

If starting or stopping the management agent fails, try restarting it a second time. If the issue persists after trying the steps in this article:

Additional Information

See Also

Vmware SQL Tips


Vmware NSX SSL creation 

Using OpenSSL for NSX Manager SSL import: Creates CSR and 4096 bit KEY Creating NSX 6.4.2 SSL    openssl req -out nsxcert.csr -newkey rsa:40...