Wednesday, June 15, 2016

Configuring a persistent scratch location for ESXi

Configuring a persistent scratch location for ESXi


I recently fell into a situation where I had to configure a persistent scratch location for some ESXi Hosts to perform some upgrades due to a full ramdisk. Every time I would try and upgrade the ESXi Hosts from 5.1 to 5.5 the upgrade would fail and when digging through the logs it always pointed to a full ramdisk. Darnit!
A quick check of the Host via SSH confirmed the erorr messages generate in vCenter Update Manager.
# vdu -h |tail -n 1
                ramdisk upgradescratch:  300M       (  100 inodes)
Since update manager was copying over the files and it was failing when trying to run the script, I went ahead and took a look at the bootbanks. There are 2 bootbanks in ESXi; /bootbank and /altbootbank. This document describes boot banks as the following.
I could have messed around cleaning up the bootbanks and the ramdisk but an easier solution was to just create a new persistent scratch location and reboot the Host. Once the new scratch locations were configured and the Hosts rebooted vCenter Upgrade Manager was able to push ESXi 5.5 to the blades without any issues.

Configuring a persistent scratch location using the vSphere Client

To configure persistent scratch space for ESXi using the vSphere Client:
  1. Connect to vCenter Server or the ESXi host using the vSphere Client.
  2. Click the ESXi host in the inventory.
  3. Click the Configuration tab.
  4. Click Storage.
  5. Right-click a datastore and click Browse.
  6. Create a uniquely-named directory for this ESXi host (for example, .locker-ESXHostname).
  7. Close the Datastore Browser.
  8. Click Advanced Settings under Software.
  9. Select the ScratchConfig section.
  10. Change the ScratchConfig.ConfiguredScratchLocation configuration option, specifying the full path to the directory. For example:/vmfs/volumes/DatastoreUUID/.locker-ESXHostname Note: To determine the Datastore UUID:
    1. Navigate to Configuration > Storage.
    2. Select the datastore.
    3. View Location under Datastore Details.The Datastore UUID appears similar to /vmfs/volumes/51dda02d-fade5016-8a08-005056171889 where51dda02d-fade5016-8a08-005056171889 is the UUID.
  11. Click OK.
  12. Put the ESXi host into maintenance mode and reboot for the configuration change to take effect.

Configuring a persistent scratch location using the vCLI

To configure persistent scratch space for ESXi using the vSphere Command-Line Interface:
Note: For more information on usage, see the vSphere Command-Line Interface Documentation.
  1. Open a command prompt at the location where the vCLI is installed.
  2. Obtain a list of datastores reachable from this ESXi host using the command:vifs.pl connectoptions --listds For example:
    vifs.pl --server esx_hostname_or_IP --username root --listds
  3. Create a uniquely-named directory for this ESXi host using the command:vifs.pl connectoptions --mkdir "[DatastoreNameDirectoryName" For example:
    vifs.pl --server esx_hostname_or_IP --username root --mkdir "[Datastore1] .locker-ESXHostname"
  4. Check the current value of the ScratchConfig.ConfiguredScratchLocation configuration option using the command:vicfg-advcfg.pl connectoptions -g ScratchConfig.ConfiguredScratchLocation For example:
    vicfg-advcfg.pl --server esx_hostname_or_IP --username root -g ScratchConfig.ConfiguredScratchLocation
    Value of ScratchConfig.ConfiguredScratchLocation is /path/to/location
  5. Change the ScratchConfig.ConfiguredScratchLocation configuration option, specifying the full path to the directory created in step 3, using the command:vicfg-advcfg.pl connectoptions -s /vmfs/volumes/DatastoreName/DirectoryNameScratchConfig.ConfiguredScratchLocation For example:
    vicfg-advcfg.pl --server esx_hostname_or_IP --username root -s /vmfs/volumes/Datastore1/.locker-ESXHostname ScratchConfig.ConfiguredScratchLocation
  6. Put the ESXi host into maintenance mode and reboot for the configuration change to take effect.

Configuring a persistent scratch location using PowerCLI

To configure persistent scratch space for ESXi using the vSphere PowerCLI interface:
Notes:
  • Before proceeding, ensure that /tmp/scratch exists. If it does not exist, use the command mkdir /tmp/scratch to create it.
  • For more information on vSphere PowerCLI usage, see the vSphere PowerCLI documentation.
  1. Open a command prompt where the PowerCLI is installed.
  2. Connect to the ESXi host using the command:connect-viserver esx_hostname_or_IP
  3. Obtain a list of datastores reachable from this ESXi host using the command:Get-Datastore
  4. Mount a datastore read/write as a PSDrive using the command:New-PSDrive -Name "mounteddatastore" -Root \ -PSProvider VimDatastore -Datastore (Get-Datastore "DatastoreName")
  5. Access the new PSDrive using the command:Set-Location mounteddatastore:
  6. Create a uniquely-named directory for this ESXi host using the command:New-Item "DirectoryName" -ItemType directory For example:
    New-Item ".locker-ESXHostname" -ItemType directory
  7. Check the current value of the ScratchConfig.ConfiguredScratchLocation configuration option using the command:Get-VMHostAdvancedConfiguration -Name "ScratchConfig.ConfiguredScratchLocation" NoteVMHostAdvancedConfiguration has been deprecated in PowerCLI 5.1 and replaced with AdvancedSetting. For more information, see the vSphere PowerCLI documentation.
  8. Change the ScratchConfig.ConfiguredScratchLocation configuration option, specifying the full path to the directory created in step 6, using the command:Set-VMHostAdvancedConfiguration -Name "ScratchConfig.ConfiguredScratchLocation" -Value "/vmfs/volumes/DatastoreName/DirectoryName" For example:
    Set-VMHostAdvancedConfiguration -Name "ScratchConfig.ConfiguredScratchLocation" -Value "/vmfs/volumes/Datastore1/.locker-ESXHostname"
  9. Put the ESXi host into maintenance mode and reboot for the configuration change to take effect.

Configuring a persistent scratch location using Tech Support Mode

To configure persistent scratch space for ESXi using Tech Support Mode on ESXi:
Notes:
  • This can be done either via the local console or SSH.
  • .filename is a hidden file. To view hidden files, use the ls -a command.
  1. Open a console to the ESXi host. For more information, see Using Tech Support Mode in ESXi 4.1 and 5.0 (1017910).
  2. Obtain a list of datastores reachable from this ESXi host using the command:ls /vmfs/volumes
  3. Create a uniquely-named directory for this ESXi host using the command:mkdir /vmfs/volumes/DatastoreName/DirectoryName For example:
    mkdir /vmfs/volumes/Datastore1/.locker-ESXHostname
  4. Check the current value of the ScratchConfig.ConfiguredScratchLocation configuration option using the command:vim-cmd hostsvc/advopt/view ScratchConfig.ConfiguredScratchLocation Example output:
    (vim.option.OptionValue) [
    (vim.option.OptionValue) {
    dynamicType = <unset>,
    key = "ScratchConfig.ConfiguredScratchLocation",
    value = "/path/to/location",
    }
    }
  5. Change the ScratchConfig.ConfiguredScratchLocation configuration option, specifying the full path to the directory created in step 3, using the command:vim-cmd hostsvc/advopt/update ScratchConfig.ConfiguredScratchLocation string /vmfs/volumes/DatastoreName/DirectoryName For example:
    /bin/vim-cmd hostsvc/advopt/update ScratchConfig.ConfiguredScratchLocation string /vmfs/volumes/Datastore1/.locker-ESXHostname
  6. Put the ESXi host into maintenance mode and reboot for the configuration change to take effect.

Configuring a persistent scratch location during scripted install using kickstart scripts

You can configure persistent scratch space for ESXi during kickstart installation by adding commands to your kickstart scripts which create the directory and change the configuration option. For more information on ESXi scripted deployments, see the ESXi Installable and vCenter Server Setup Guide.
Append these commands to your custom kickstart script:
# Generate a new scratch directory for this host on a Datastore
scratchdirectory=/vmfs/volumes/DatastoreName/.locker-$(hostname 2> /dev/null)-$(esxcfg-info -b 2> /dev/null)

# Create the scratch directory
mkdir -p $scratchdirectory

# Change the advanced configuration option
vim-cmd hostsvc/advopt/update ScratchConfig.ConfiguredScratchLocation string $scratchdirectory
Note: The configured scratch location is activated during startup of the ESXi host. A reboot is required after performing the preceding commands.

Configuring a persistent scratch location using the vSphere Web Client for ESXi 5.1

To configure persistent scratch space for ESXi using the vSphere Web Client:
  1. Log in to the vCenter Server using the vSphere Web Client.
  2. Click Hosts and Clusters, then click the specific host.
  3. Click the Manage tab.
  4. Click Settings.
  5. Under System, click Advanced System Settings.
  6. Locate ScratchConfig.ConfiguredScratchLocation.
  7. Click Edit and add the path to the scratch directory.
  8. Reboot the host for the changes to take effect.

How to upgrade or patch ESX 5.x

To patch an ESXi 5.x/6.x host from the command line:

  1. Patches for VMware products can be obtained from the VMware patch portal. Select ESXi (Embedded and Installable) in the product dropdown and click Search.
  2. Click the Download link below the patch Release Name to download the patch to your system.
  3. Upload the patch to a datastore on your ESXi 5.x/6.x host using the Datastore Browser from vCenter Server or a direct connection to the ESXi 5.x/6.x host using the vSphere client.

    Note: VMware recommends creating a new directory on the datastore and uploading the patch file to this directory.
  4. Log in to the local Tech Support Mode console of the ESXi 5.x/6.x host. For more information, see Using Tech Support Mode in ESXi 4.1 and ESXi 5.x (1017910).
  5. Migrate or power off the virtual machines running on the host and put the host into maintenance mode. The host can be put into maintenance mode by running this command:

    # vim-cmd hostsvc/maintenance_mode_enter 
  6. Navigate to the directory on the datastore where the patch file was uploaded to and verify that the file exists by running these commands:

    # cd /vmfs/volumes/Datastore/DirectoryName
    # ls 


    Where Datastore is the datastore name where the patch file was uploaded to, and DirectoryName is the directory you created on the datastore.
  7. Install or update a patch on the host using these esxcli commands:

    Notes:

    • To install or update a .zip file, use the -d option. To install or update a .vib file use the -v option.
    • Using the update command is the recommended method for patch application. Using this command applies all of the newer contents in a patch, including all security fixes. Contents of the patch that are a lower revision than the existing packages on the system are not applied.
    • Using the install command overwrites the existing packages in the system with contents of the patch you are installing, including installing new packages and removing old packages. The install command may downgrade packages on the system and should be used with caution. If required, the install command can be used to downgrade a system (only for image profiles) when the --allow-downgrade flag is set.
    Caution: The install method has the possibility of overwriting existing drivers. If you are using third-party ESXi images, VMware recommends using the update method to prevent an unbootable state.
    To Install:

    • Using local setup:

      # esxcli software vib install -d "/vmfs/volumes/Datastore/DirectoryName/PatchName.zip

      Where PatchName.zip is the name of the patch file you uploaded to the datastore.

      Note: Alternatively, you can use the datastore's UUID instead of the DirectoryName .

      For example:

      # esxcli software vib install -d "/vmfs/volumes/datastore1/patch-directory/ESXi500-201111001.zip" 

      or

      # esxcli software vib install -d "/vmfs/volumes/a2bb3e7c-ca10571c-cec6-e5a60cc0e7d0/patch-directory/ESXi500-201111001.zip" 
    • Using http setup:

      # esxcli software vib install -v viburl 

      Where viburl is the URL to the http depot where VIB packages reside.

      For example:

      # esxcli software vib install -v https://hostupdate.vmware.com/software/VUM/PRODUCTION/main/esx/vmw/vib20/tools-light/VMware_locker_tools-light_5.0.0-0.7.515841.vib 
    To Update:

    • Using local setup:

      # esxcli software vib update -d "/vmfs/volumes/Datastore/DirectoryName/PatchName.zip"

      Where PatchName.zip is the name of the patch file you uploaded to the datastore.

      Note: Alternatively, you can use the datastore's UUID instead of the DirectoryName .

      For example:

      # esxcli software vib update -d "/vmfs/volumes/datastore1/patch-directory/ESXi500-201111001.zip" 

      or

      # esxcli software vib update -d "/vmfs/volumes/ a2bb3e7c-ca10571c-cec6-e5a60cc0e7d0/patch-directory/ESXi500-201111001.zip" 
    • Using http setup:

      # esxcli software vib update -v viburl 

      Where viburl is the URL to the http depot where VIB packages reside.

      For example:

      # esxcli software vib update -v https://hostupdate.vmware.com/software/VUM/PRODUCTION/main/esx/vmw/vib20/tools-light/VMware_locker_tools-light_5.0.0-0.7.515841.vib
  8. Verify that the VIBs are installed on your ESXi host:

    # esxcli software vib list 

    For example:

    # esxcli software vib list 

    Name              Version                     Vendor Acceptance Level Install Date
    ----------------- --------------------------- ------ ---------------- ------------
    ata-pata-amd      0.3.10-3vmw.500.0.0.469512  VMware VMwareCertified  2012-05-04
    ata-pata-atiixp   0.4.6-3vmw.500.0.0.469512   VMware VMwareCertified  2012-05-04
    ata-pata-cmd64x   0.2.5-3vmw.500.0.0.469512   VMware VMwareCertified  2012-05-04
    ata-pata-hpt3x2n  0.3.4-3vmw.500.0.0.469512   VMware VMwareCertified  2012-05-04 

  9. After the patch has been installed, reboot the ESX host:

    # reboot 
  10. After the host has finished booting, exit maintenance mode and power on the virtual machines:

    # vim-cmd hostsvc/maintenance_mode_exit

Tuesday, June 14, 2016

Great 3par Array Best Practices

http://h20564.www2.hpe.com/hpsc/doc/public/display?docId=c03290624

Good read 

Checking Vmware Perf Logs

login as: root

VMware vCenter Server Appliance 6.0.0.20000

Type: vCenter Server with an external Platform Services Controller

root@10.1.7.20's password:
Last login: Mon Jun 13 16:03:32 2016 from pbtpvmpxe.st.com
Connected to service

    * List APIs: "help api list"
    * List Plugins: "help pi list"
    * Enable BASH access: "shell.set --enabled True"
    * Launch BASH: "shell"

Command>
Command> shell.set --enabled True
Command> shell
    ---------- !!!! WARNING WARNING WARNING !!!! ----------

Your use of "pi shell" has been logged!

The "pi shell" is intended for advanced troubleshooting operations and while
supported in this release, is a deprecated interface, and may be removed in a
future version of the product.  For alternative commands, exit the "pi shell"
and run the "help" command.

The "pi shell" command launches a root bash shell.  Commands within the shell
are not audited, and improper use of this command can severely harm the
system.

Help us improve the product!  If your scenario requires "pi shell," please
submit a Service Request, or post your scenario to the
https://communities.vmware.com/community/vmtn/vcenter/vc forum and add
"appliance" tag.

p111vc01:~ # cd /var/log/vmware/
p111vc01:/var/log/vmware # ll
total 136
drwxr-xr-x 3 root           root       4096 Jun 13 16:02 applmgmt
drwxr-xr-x 2 root           root       4096 Jun 12 22:10 cloudvm
drwxr-xr-x 4 cm             cis        4096 Jun  3 22:50 cm
drwxr-xr-x 3 eam            cis        4096 Jun 13 12:24 eam
drwx------ 9 root           root       4096 Jun 12 08:42 esx
drwx------ 2 root           root       4096 Jan 21 07:10 iiad
drw-r--r-- 2 root           root       4096 Jun 13 15:40 invsvc
lrwxrwxrwx 1 root           root         19 Mar 17 21:50 journal -> /storage/db/journal
drwxr--r-- 2 mbcs           cis        4096 Feb 12 11:53 mbcs
drwxrwx--- 2 netdumper      netdumper  4096 Mar 17 23:43 netdumper
drwxr--r-- 2 perfcharts     cis       20480 Jun 13 11:12 perfcharts
drwxrwxr-x 2 deploy         deploy     4096 Jun 12 23:56 rbd
drwx------ 3 root           root       4096 Jun  3 22:50 rhttpproxy
drwx------ 2 root           root       4096 Oct 13  2015 rsyslogd
drwxr-xr-x 3 root           root       4096 Jun 13 15:32 sca
drwxr-xr-x 3 root           root       4096 Jun 12 07:41 syslog
dr-xr-x--- 3 vapiEndpoint   cis        4096 Jan 14 02:49 vapi
dr-xr-x--- 2 vapiEndpoint   cis        4096 Jan 14 02:49 vapi-endpoint
drwxr-xr-x 2 root           root       4096 Mar  8 05:22 vctop
drwxr-xr-x 3 vdcs           root       4096 Jun 13 01:01 vdcs
drwxr-xr-x 2 root           root       4096 Oct 13  2015 vmafd
drwx------ 2 root           root       4096 Jun 13 03:00 vmafdd
drwxr-xr-x 2 root           root       4096 Jan 13 01:30 vmdir
drwxr-xr-x 2 root           root       4096 Jun 13 02:15 vmware-sps
drwxr-xr-x 3 vpostgres      root       4096 Nov 11  2015 vpostgres
drwxr-xr-x 6 root           root       4096 Jun 13 14:06 vpxd
drwxr-xr-x 2 vsan-health    root       4096 Jun 13 02:27 vsan-health
drwxr-xr-x 3 vsm            cis        4096 Jun  9 05:31 vsm
drwxr-xr-x 4 vsphere-client root       4096 Jun  3 22:52 vsphere-client
drwxr-x--x 3 root           root       4096 Oct 13  2015 vws
drwxr-xr-x 2 vpx-workflow   cis        4096 Jun  3 22:52 workflow
p111vc01:/var/log/vmware # cd vsphere-client/
p111vc01:/var/log/vmware/vsphere-client # ll
total 14116
drwx------ 5 vsphere-client users    4096 Mar  4 16:00 logbrowser
drwxr-xr-x 3 vsphere-client root     4096 Jun  6 13:57 logs
-rw------- 1 vsphere-client users 1049246 Apr 24 16:35 vsphere-client-gc.log.0
-rw------- 1 vsphere-client users  913668 Jun 13 16:03 vsphere-client-gc.log.0.current
-rw------- 1 vsphere-client users 1048908 Apr 26 03:16 vsphere-client-gc.log.1
-rwx------ 1 vsphere-client users 1048703 May  4 07:22 vsphere-client-gc.log.2
-rwx------ 1 vsphere-client users 1049110 May 23 11:40 vsphere-client-gc.log.3
-rw------- 1 vsphere-client users  627862 Jun  3 22:30 vsphere-client-gc.log.4.current
-rwx------ 1 vsphere-client users 1049207 Feb  9 06:06 vsphere-client-gc.log.5
-rwx------ 1 vsphere-client users 1048998 Feb  9 10:59 vsphere-client-gc.log.6
-rwx------ 1 vsphere-client users 1048889 Feb  9 17:25 vsphere-client-gc.log.7
-rwx------ 1 vsphere-client users 1049187 Feb  9 23:21 vsphere-client-gc.log.8
-rwx------ 1 vsphere-client users 1049262 Feb 10 04:54 vsphere-client-gc.log.9
-rwx------ 1 vsphere-client users 3372895 Jun  4 10:40 wrapper.log
p111vc01:/var/log/vmware/vsphere-client # cd logs/
p111vc01:/var/log/vmware/vsphere-client/logs # ll
total 112512
drwx------ 2 vsphere-client users    20480 Jun 13 00:00 access
-rwx------ 1 vsphere-client users  2138308 Jun  4 10:40 eventlog.log
-rwx------ 1 vsphere-client users        0 Oct 13  2015 query_profile_dataservice.log
-rw------- 1 vsphere-client users 51813791 Jun 13 16:04 vsphere_client_virgo.log
-rw------- 1 vsphere-client users  2464272 Jun  6 13:57 vsphere_client_virgo_0.log.zip
-rw------- 1 vsphere-client users  2412590 May 31 02:54 vsphere_client_virgo_1.log.zip
-rw------- 1 vsphere-client users  2360444 May 24 10:33 vsphere_client_virgo_2.log.zip
-rw------- 1 vsphere-client users  2348343 May 17 21:07 vsphere_client_virgo_3.log.zip
-rw------- 1 vsphere-client users  2393618 May 11 13:18 vsphere_client_virgo_4.log.zip
-rw------- 1 vsphere-client users  2420328 May  5 03:24 vsphere_client_virgo_5.log.zip
-rw------- 1 vsphere-client users  2416921 Apr 29 12:26 vsphere_client_virgo_6.log.zip
-rw------- 1 vsphere-client users  2853224 Apr 20 05:56 vsphere_client_virgo_7.log.zip
-rw------- 1 vsphere-client users  2571713 Apr 15 14:16 vsphere_client_virgo_8.log.zip
-rw------- 1 vsphere-client users  2081604 Apr 10 19:19 vsphere_client_virgo_9.log.zip
-rw------- 1 vsphere-client users 19332198 Jun 13 16:03 vspheremessaging.log
-rw------- 1 vsphere-client users  2095797 Jun  3 09:03 vspheremessaging_0.log.zip
-rw------- 1 vsphere-client users  2090504 May 19 00:47 vspheremessaging_1.log.zip
-rw------- 1 vsphere-client users  2127360 May  5 10:53 vspheremessaging_2.log.zip
-rw------- 1 vsphere-client users  2140566 Apr 18 04:18 vspheremessaging_3.log.zip
-rw------- 1 vsphere-client users  2231428 Mar 26 03:08 vspheremessaging_4.log.zip
-rwx------ 1 vsphere-client users  2259049 Feb 19 11:59 vspheremessaging_5.log.zip
-rwx------ 1 vsphere-client users  2193377 Jan 28 22:04 vspheremessaging_6.log.zip
-rwx------ 1 vsphere-client users  2242915 Jan 13 06:08 vspheremessaging_7.log.zip
p111vc01:/var/log/vmware/vsphere-client/logs # less vsphere_client_virgo.log
p111vc01:/var/log/vmware/vsphere-client/logs # cd ..
p111vc01:/var/log/vmware/vsphere-client # cd ..
p111vc01:/var/log/vmware # find -name stats.log
./perfcharts/stats.log
p111vc01:/var/log/vmware # less /perfcharts/stats.log
/perfcharts/stats.log: No such file or directory
p111vc01:/var/log/vmware # less perfcharts/stats.log
p111vc01:/var/log/vmware # date
Mon Jun 13 16:07:09 EDT 2016
p111vc01:/var/log/vmware # less perfcharts/stats.log
Caused by: com.vmware.vim.sso.client.exception.ServerCommunicationException: Error communicating to the remote server https://p222vcpsc.s
t.com/sts/STSService/sterlingbackcheck.com
        at com.vmware.vim.sso.client.impl.SoapBindingImpl.sendMessage(SoapBindingImpl.java:147)
        at com.vmware.vim.sso.client.impl.SoapBindingImpl.sendMessage(SoapBindingImpl.java:81)
        at com.vmware.vim.sso.client.impl.SecurityTokenServiceImpl$RequestResponseProcessor.sendRequest(SecurityTokenServiceImpl.java:769
)
        ... 15 more
Caused by: com.sun.xml.internal.ws.client.ClientTransportException: HTTP transport error: java.net.ConnectException: Connection timed out
        at com.sun.xml.internal.ws.transport.http.client.HttpClientTransport.getOutput(Unknown Source)
        at com.sun.xml.internal.ws.transport.http.client.HttpTransportPipe.process(Unknown Source)
        at com.sun.xml.internal.ws.transport.http.client.HttpTransportPipe.processRequest(Unknown Source)
        at com.sun.xml.internal.ws.transport.DeferredTransportPipe.processRequest(Unknown Source)
        at com.sun.xml.internal.ws.api.pipe.Fiber.__doRun(Unknown Source)
        at com.sun.xml.internal.ws.api.pipe.Fiber._doRun(Unknown Source)
        at com.sun.xml.internal.ws.api.pipe.Fiber.doRun(Unknown Source)
        at com.sun.xml.internal.ws.api.pipe.Fiber.runSync(Unknown Source)
        at com.sun.xml.internal.ws.client.Stub.process(Unknown Source)
        at com.sun.xml.internal.ws.client.dispatch.DispatchImpl.doInvoke(Unknown Source)
        at com.sun.xml.internal.ws.client.dispatch.DispatchImpl.invoke(Unknown Source)
        at com.vmware.vim.sso.client.impl.SoapBindingImpl.sendMessage(SoapBindingImpl.java:130)
        ... 17 more
Caused by: java.net.ConnectException: Connection timed out
        at java.net.PlainSocketImpl.socketConnect(Native Method)
        at java.net.AbstractPlainSocketImpl.doConnect(Unknown Source)
        at java.net.AbstractPlainSocketImpl.connectToAddress(Unknown Source)
        at java.net.AbstractPlainSocketImpl.connect(Unknown Source)
        at java.net.SocksSocketImpl.connect(Unknown Source)
        at java.net.Socket.connect(Unknown Source)
        at sun.security.ssl.SSLSocketImpl.connect(Unknown Source)
        at sun.security.ssl.BaseSSLSocketImpl.connect(Unknown Source)
        at sun.net.NetworkClient.doConnect(Unknown Source)
        at sun.net.www.http.HttpClient.openServer(Unknown Source)
        at sun.net.www.http.HttpClient.openServer(Unknown Source)
        at sun.net.www.protocol.https.HttpsClient.<init>(Unknown Source)
        at sun.net.www.protocol.https.HttpsClient.New(Unknown Source)
        at sun.net.www.protocol.https.AbstractDelegateHttpsURLConnection.getNewHttpClient(Unknown Source)
        at sun.net.www.protocol.http.HttpURLConnection.plainConnect(Unknown Source)
perfcharts/stats.log lines 11413-11447/11522 99%

Friday, June 10, 2016

ESX commands 6

http://www.doublecloud.org/2015/05/vmware-esxi-esxcli-command-a-quick-tutorial/


Monday, June 6, 2016

Check windows OS disk allocation unit size

fsutil fsinfo ntfsinfo n:


Using disk part:

Microsoft Windows [Version 6.1.7601]
Copyright (c) 2009 Microsoft Corporation.  All rights reserved.

C:\Windows\system32>chkdsk
The type of the file system is NTFS.

WARNING!  F parameter not specified.
Running CHKDSK in read-only mode.

CHKDSK is verifying files (stage 1 of 3)...
  128512 file records processed.
File verification completed.
  448 large file records processed.
  0 bad file records processed.
  0 EA records processed.
  908 reparse records processed.
CHKDSK is verifying indexes (stage 2 of 3)...
25 percent complete. (158832 of 190012 index entries processed)
C:\Windows\system32>fsutil
---- Commands Supported ----

8dot3name       8dot3name managment
behavior        Control file system behavior
dirty           Manage volume dirty bit
file            File specific commands
fsinfo          File system information
hardlink        Hardlink management
objectid        Object ID management
quota           Quota management
repair          Self healing management
reparsepoint    Reparse point management
resource        Transactional Resource Manager management
sparse          Sparse file control
transaction     Transaction management
usn             USN management
volume          Volume management

C:\Windows\system32>fsutil sfinfo ntfs info n:
sfinfo is an invalid parameter.
---- Commands Supported ----

8dot3name       8dot3name managment
behavior        Control file system behavior
dirty           Manage volume dirty bit
file            File specific commands
fsinfo          File system information
hardlink        Hardlink management
objectid        Object ID management
quota           Quota management
repair          Self healing management
reparsepoint    Reparse point management
resource        Transactional Resource Manager management
sparse          Sparse file control
transaction     Transaction management
usn             USN management
volume          Volume management

C:\Windows\system32>futil sfinfo ntfs info n:
'futil' is not recognized as an internal or external command,
operable program or batch file.

C:\Windows\system32>futil fsinfo ntfs info n:
'futil' is not recognized as an internal or external command,
operable program or batch file.

C:\Windows\system32>futil fsinfo ntfsinfo n:
'futil' is not recognized as an internal or external command,
operable program or batch file.

C:\Windows\system32>fsutil fsinfo ntfsinfo n:
NTFS Volume Serial Number :       0xe648bffb48bfc897
Version :                         3.1
Number Sectors :                  0x00000001fffbefff
Total Clusters :                  0x000000003fff7dff
Free Clusters  :                  0x000000000bfe5e8f
Total Reserved :                  0x0000000000000000
Bytes Per Sector  :               512
Bytes Per Physical Sector :       <Not Supported>
Bytes Per Cluster :               4096
Bytes Per FileRecord Segment    : 1024
Clusters Per FileRecord Segment : 0
Mft Valid Data Length :           0x0000000000f80000
Mft Start Lcn  :                  0x00000000000c0000
Mft2 Start Lcn :                  0x0000000000000002
Mft Zone Start :                  0x00000000000c0f80
Mft Zone End   :                  0x00000000000cc840
RM Identifier:        DF6C6C0A-D45A-11E2-85FB-3C4A92ED2920

C:\Windows\system32>diskpart list

Microsoft DiskPart version 6.1.7601
Copyright (C) 1999-2008 Microsoft Corporation.
On computer: PBTPSQL24

DiskPart was unable to process the parameters.
Use 'diskpart /?' for more information.

C:\Windows\system32>diskpart

Microsoft DiskPart version 6.1.7601
Copyright (C) 1999-2008 Microsoft Corporation.
On computer: PBTPSQL24

DISKPART> list

Microsoft DiskPart version 6.1.7601

DISK        - Display a list of disks. For example, LIST DISK.
PARTITION   - Display a list of partitions on the selected disk.
              For example, LIST PARTITION.
VOLUME      - Display a list of volumes. For example, LIST VOLUME.
VDISK       - Displays a list of virtual disks.

DISKPART> list volumes

Microsoft DiskPart version 6.1.7601

DISK        - Display a list of disks. For example, LIST DISK.
PARTITION   - Display a list of partitions on the selected disk.
              For example, LIST PARTITION.
VOLUME      - Display a list of volumes. For example, LIST VOLUME.
VDISK       - Displays a list of virtual disks.

DISKPART> list volume

  Volume ###  Ltr  Label        Fs     Type        Size     Status     Info
  ----------  ---  -----------  -----  ----------  -------  ---------  --------
  Volume 0     C                NTFS   Partition     99 GB  Healthy    System
  Volume 1     Z                NTFS   Partition   1535 GB  Healthy
  Volume 2     L   AbsHireDB    NTFS   Partition   2047 GB  Healthy
  Volume 3     R   AbsoRptDB    NTFS   Partition    799 GB  Healthy
  Volume 4     S   AbsoRptLOGS  NTFS   Partition    501 GB  Healthy
  Volume 5     J   New Volume   NTFS   Partition     29 GB  Healthy
  Volume 6     K   New Volume   NTFS   Partition      9 GB  Healthy
  Volume 7     V   absHireDB_S  NTFS   Partition   2999 GB  Healthy
  Volume 8     T                NTFS   Partition    599 GB  Healthy
  Volume 9     U   AbsoTempDBL  NTFS   Partition    149 GB  Healthy
  Volume 10    P   AbsoTempDB   NTFS   Partition    299 GB  Healthy
  Volume 11    W   PURE         NTFS   Partition    499 GB  Healthy
  Volume 12    N   AbsoArchive  NTFS   Partition   4095 GB  Healthy
  Volume 13    X   PURE_TempDB  NTFS   Partition    299 GB  Healthy
  Volume 14    Y   Pure-H-driv  NTFS   Partition   4000 GB  Healthy
  Volume 15    H   TemporaryPu  NTFS   Partition   1535 GB  Healthy
  Volume 16    O   AbsoArchive  NTFS   Partition   1535 GB  Healthy
  Volume 17    M   Quorum       NTFS   Partition   3069 MB  Healthy
  Volume 18    Q   MSDTC        NTFS   Partition   2045 MB  Healthy
  Volume 19    E   AbsoLOGS     NTFS   Partition   1535 GB  Healthy
  Volume 20    F   AbsoDB       NTFS   Partition   2047 GB  Healthy
  Volume 21    G   MaestroDB    NTFS   Partition     49 GB  Healthy
  Volume 22    I   MaestroLOGS  NTFS   Partition   5117 MB  Healthy

DISKPART> select volume 2

Volume 2 is the selected volume.

DISKPART> filesystems

Current File System

  Type                 : NTFS
  Allocation Unit Size : 4096
  Flags : 00000000

File Systems Supported for Formatting

  Type                 : NTFS (Default)
  Allocation Unit Sizes: 512, 1024, 2048, 4096 (Default), 8192, 16K, 32K, 64K

DISKPART>

Friday, June 3, 2016

Stopping and Starting Services on vCenter Service Appliance 6 (VCSA)

Stopping and Starting Services on vCenter Service Appliance 6 (VCSA)

In my previous post I wrote about patching a VCSA box.  At the end of that patching processes a reboot (according to VMware) is an optional step.  However, in my case, the vCenter Web Services didn’t appear to have restarted correctly.  A reboot ultimately did resolve that issue for me, but it did start me thinking about how would I go about restarting VCSA services if the Web Client was down.  It turns out vCenter 6 has a new recommended way of restarting services using the Service Control command for both the VCSA and the Windows version.
As with my post on modifying NTP settings.  Restarting services can be done via two methods, the Web Client or via the console.  Method 1 is the easiest when access to the Web Client is there.  Method 2 relies on using the VCSA console when access to the Web Client doesn’t exist or is lost.k
Method 1.Restarting services via the Web Client
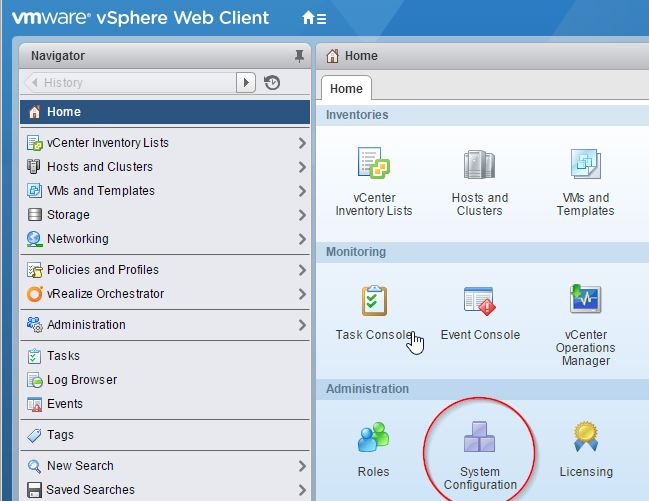
On the Home screen of the Web Client select Administration -> System Configuration
enable_ssh-000182
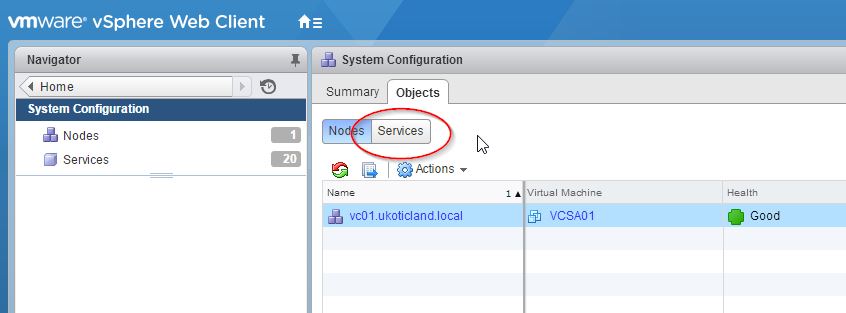
Click on the Services button on the right pane.
restart_ssh-000210
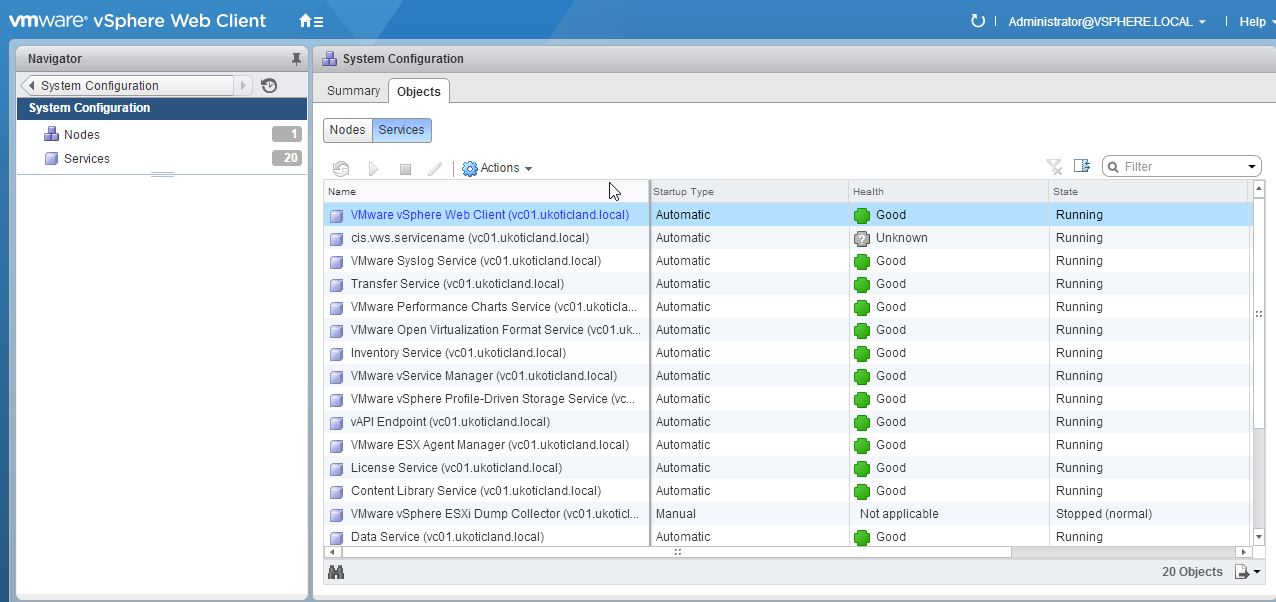
As I’ve mentioned previously finding what you want in the Web Client isn’t always intuitive as you might think.  Clicking on Services in the left pane isn’t what you want.  Rather clicking on the Services tab button on the right pane gives you a better overall status of services.
restart_ssh-000219
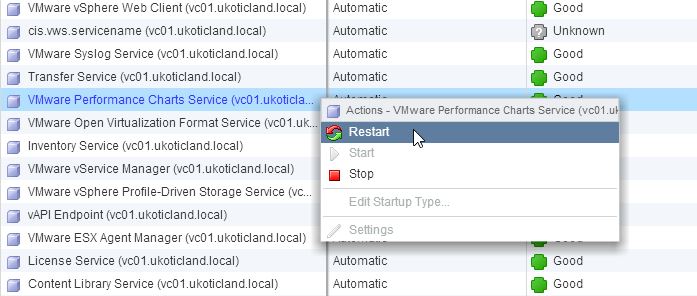
From here was can right click on any services, start, stop, restart, edit startup, and change settings on that service.  Not all services have modifiable settings via the Web Client.  This options will show up grayed out.  Once you change the state of a service you’ll find you have to refresh the page for the next state to be displayed correctly.
restart_ssh-000220
Method 2.
Restarting services via the Console
I’ll assume you already know how to enable and have access to SSH or at least the Remote Console.  If not I cover enabling SSH here.
You may come across doco that says you have to enable and enter the pi shell / bash, but this isn’t required.  Everything can be done from the VMware Command prompt
We can start of by running a command that simply lists services.
Command> service-control --list
This will list all vCenter specific services.  We can then run service-control --status for a bit of a messy view of what’s currently Running and Stopped.
Command> service-control --status
Unlike the Web Client there is no restart Service Control switches, Only start and stop.  To stop a service we run the below at the prompt.  servicename being the name of a service displayed using --list
Command> service-control --stop servicename
or to start
Command> service-control --start servicename
You can also use the --all switch in place of servicename.  I see this as a bit of a catch all.  Using this switch will only start services that have a startup type of Automatic and are currently stopped.  If a service is currently running it will be skipped.  This is a great way to get everything back up and running quickly.
Command> service-control --start --all
The reverse is true when using --all to stop services.  All services that have a startup type of Automatic and are currently running will attempt to be stopped.  Everything else will be skipped.
Command> service-control --stop --all
There are two final switches that can also be used with the --all.  --ignore and --dry-run.  The --ignore will continue to start or stop all services if an error is encountered at any point.  --dry-run will display what actions the take place with the service without actually changing anything.
Command> service-control --start --all --ignore
Command> service-control --start --all --dry-run

Vmware NSX SSL creation 

Using OpenSSL for NSX Manager SSL import: Creates CSR and 4096 bit KEY Creating NSX 6.4.2 SSL    openssl req -out nsxcert.csr -newkey rsa:40...