Wednesday, February 15, 2017

Wednesday, February 1, 2017
How to create RDM mappings for SQL Clustering with MSCS on VMware 6.0 -
Using vSphere 6.0
For the sake of this discussion, we’re building two VMs for use in a two node failover MSCS cluster for SQL 2012. We’ll simply call them A and B.
We will be using the Web Client for this, since that’s the direction VMware is pushing. However, the Fat (C#) client is faster for this task as it takes fewer steps. For example, on the fat client, when you create the first RDM mapping, it will automatically create a new, second SCSI controller. When on the web client, you have to manually create the SCSI controller first, then start building the RDM drives.
The documentation in the 6.0 documents is very sparse, and I don’t think it’s even complete or accurate so this took a bit of effort to figure out and get set up.
Add a new SCSI Controller (we had issues with other “types” and use VMware Paravirtual exclusively now)

Saturday, January 28, 2017
SQL Server 2012 Multi-Subnet Cluster + SQL HA setup + adding nodes
SQL Server 2012 Multi-Subnet Cluster
Powershell commands
Powershell commands
#List different cluster resources
PS C:\>Get-ClusterResource | Select Name, ResourceType
#List parameters and their values of the SQL Server Network name
PS C:\>Get-ClusterResource "SQL Network Name (SQLMULTISUBCLUS)" | Get-ClusterParameter
#Set parameter value
PS C:\>Get-ClusterResource "SQL Network Name (SQLMULTISUBCLUS)" | Set-ClusterParameter HostRecordTTL 300
The first line is simply to retrieve all of the cluster resource names in the cluster. We want to know the cluster resource name of the virtual server name of the SQL Server instance, in this case, SQL Server (MSSQLSERVER). The next line simply grabs all the cluster resource parameters for the cluster resource named SQL Server (MSSQLSERVER). The parameter that we want to modify is HostRecordTTL. As I've previously mentioned, the default value is 1200 seconds. The third line simply changes the HostRecordTTL parameter value to 300.Once the cluster parameter value has been changed, the client applications will no longer have to wait for 20 minutes in order to get the name resolution correctly and, thus, minimizing "perceived" downtime.Another thing that we need to look into is how the virtual server name gets registered in the DNS server. Microsoft DNS is usually implemented with Active Directory integration which means that an update in the DNS made in one Active Directory site in a subnet may take a while to replicate to another Active Directory-integrated DNS server on another site with a different subnet. This can be addressed by registering all of the virtual IP addresses for the virtual server name on all of the DNS servers even when the virtual IP address is not online. This gives the DNS client an opportunity to store all of the possible IP addresses for a virtual server name. However, this assumes that the client application is smart enough to retry a connection against all available IP addresses for a given virtual server name. The default behavior of a cluster resource name is to only register the virtual IP address that successfully comes online. In our example, the virtual IP address 172.16.0.113 will only be registered in the DNS server within that subnet when it successfully goes online. The same thing is true with the virtual IP address 192.168.0.113. This results in having just one entry per DNS server per subnet for the virtual server name instead of two. To modify this behavior, run this code:#List parameters and their values of the SQL Server Network name PS C:\>Get-ClusterResource "SQL Network Name (SQLMULTISUBCLUS)" | Get-ClusterParameter #Set parameter value PS C:\>Get-ClusterResource "SQL Network Name (SQLMULTISUBCLUS)" | Set-ClusterParameter RegisterAllProvidersIP 1
Tuesday, January 10, 2017
Vmware vCenter – Common Logging Service Health Alarm
Vmware vCenter – Common Logging Service Health Alarm
Vmware vCenter – Common Logging Service Health Alarm
- Service Common Logging Service (VMware-syslog) is stopped (not my case)
- on /storage/logs is out of space

with df -h command verify, which disc has a capacity problems – /storage /log – we see that it is used on 88%, so we will increase it.

We will use the vSphere Client or vSphere Web Client and increase capacity on the virtual disk 5 for 10 GB.


We have increased. now is used only 44% of capacity..
Wednesday, January 4, 2017
Monday, November 28, 2016
vCenter Host Gateway … more than meets the eye vCenter Host Gateway
While going through the download motion like many of you when vSphere 6.0 was generally available, something that caught my eye in the vCenter Server download area was something called the vCenter Host Gateway (vCHG) virtual appliance. At first, I did not know what that was and until I spoke to a few colleagues did I realize that vCHG is the evolution of the Multi-Hypervisor Management (MHM) Plugin which provides vSphere Administrators a way to natively manage Hyper-V hosts within the vCenter Server UI. MHM was originally released as a Fling and later then productized within the vCenter Server product. At the time, it made sense for the plugin to be Windows based as it needed to connect to Hyper-V which obviously ran on Microsoft Windows.
It looks like the folks over in the MHM team have been quite busy as they have gotten rid of the Windows installer and have now provided a Virtual Appliance which uses winrm to directly communicate to the Hyper-V hosts. In addition, you can now manage Hyper-V hosts within the vSphere Web Client where as previously it was only available using the vSphere C# Client. vCHG works with both vCenter Server for Windows as well as the vCenter Server Appliance, there are no additional Windows host required for this new solution. Deploying and configuring vCHG is relatively straight forward and you can find all the instructions here. There were a few minor gotchas that I ran into and I thought it would be worth sharing, especially figuring out what was needed on the Hyper-V hosts which was mainly due to my lack of familiarity with winrm.
You have the option of configuring winrm to go over standard HTTP (port 5985) or HTTPS (port 5986) on the Hyper-V host but the latter requires you to setup SSL Certificates which you can find more details here. For that reason, I just went with the default HTTP method to quickly get going. To configure winrm, you will need to run following command and accept the default with "y":
winrm quickconfig
Next, you will need to enable winrm listener as shown in the screenshot below by running the following command:
winrm e winrm/config/listener

At this point, you can now login to your vSphere Web Client and to add a Hyper-V host, you will need to add at the vSphere Datacenter level. This was another thing that I missed and though could be added into its own vSphere Cluster. As you can see from the screenshot below, we have extended our "Add Host" workflow to natively support Hyper-V hosts, so that it is intuitive and familiar for our vSphere Administrators.

You will need to specify both the Hostname/IP Address of Hyper-V host followed by the winrm port (e.g. hostname:5985) and then select the Type to be "Hyper-V" and in a just a few seconds, you will be able to see your Hyper-V hosts within vCenter Server and perform basic power operations as well as creating/managing VMs running on Hyper-V. Below is a screenshot of my Hyper-V host and I just finished created a new VM using the vSphere Web Client and you can see it seamless integrated into a single view.

This is great enhancement for customers who have to run a mix workload between vSphere and Hyper-V (I do apologize to those in advance ;)) but at least you now truly now have a single integrated pane of glass to manage all your workloads. I also do want to stress the word "integrated" beyond just the UI component that vCHG provides. I have found that all the operations through the vSphere Web Client is also exposed through our rich vSphere API, for example the AddHost_Task() method now includes a new hostGateway spec. This also means you will be able to use all the existing power operations and create VMs methods against your Hyper-V hosts, again tightly integrated into the existing tools you are familiar with such as PowerCLI for example for Automation. How freaking cool is that!?
but wait ... there's more! 
While going through the exercise of deploying vCHG and adding Hyper-V host, I could not help but wonder why we named this feature "Host Gateway", especially since we only supported a single third party hypervisor, did not really make sense to me? Well, it turns out there is a lot more coming! When you select the "Type" from the drop down menu, I notice there were a few more options: KVM and vCloud Air!

I of course I tried to add a KVM host as well as my vCloud Air account but looks like those providers are not available just yet. I am actually quite excited to see support for vCloud Air. This has always been something I felt should have been available natively within the vSphere Inventory so that an administrator could deploy their workloads either locally on-premises or hosted on vCloud Air without having to jump around. It should align with the existing vSphere Administrator workflows and I am glad to see this change. This is definitely an area that I recommend keeping an eye out on and hopefully we will see vCloud Air support soon!
Tuesday, November 22, 2016
HOW TO ALLOW SHELL AND SCP ACCESS IN VCENTER 6 APPLIANCE WINSCP
https://vmexpo.wordpress.com/2015/06/05/how-to-allow-shell-and-scp-access-in-vcenter-6-appliance/


Few days back. I had installed vCenter 6 appliance and configured it. Today I need to copy Microsoft sysprep files into the vcenter appliance to configure guest customization. But when I tried to connect using winscp client. I got the following error.

If you click on “Abort” Button then the actual error displayed. Which tells you why there is no access on appliance. Click “OK”

Solution 1:
This solution does not required any configuration in vCenter Appliance side. From “WinSCP” Client. Choose “SFTP” File protocol from drop down and enter vCenter credentials -> Click “Advanced” Button ->in Advance Site Settings-> Under “Environment -> SFTP -> In “Protocol options” Section -> Enter below command in “SFTP Server” settings.
shell /usr/lib64/ssh/sftp-server
Click “Save” and “Connect” the Client.it should work.

Without doing above settings. If you try to connect using SFTP .you will get following error.

Solution 2.
This solution required changes on vCenter appliance Side.
Option 1: From vCenter Appliance:
Using Classic Client:
Here is the 2nd solution of the problem. Access the vCenter appliance using vSphere classic Client.

Click “F2” and enter the “root user credentials” then again click “F2” to access the Customize System options.
In “System Customization” -> Select “Troubleshooting Mode Options” -> Press“Enter”

In Troubleshooting Mode options -> Select “Bash Shell” option and Press “enter”. Optionally you can enable “SSH” as well. Press “ESC twice” to “save” the setting and “exit” from the settings.

Using Web Client:
You can enable both options SSH and Bash from web client as well.
From Web Client home->Administration->Under Deployment->System Configuration -> Click On “Nodes” -> Click on Node Name “vCenter” -> Under vCenter settings -> Manage -> Settings -> Firewall -> Click “Edit”.
In “Edit Setting” -> Access ->Verify both check box are checked.

At this stage, if you are not in vCenter appliance console then go their and Press “ALT+F1” to access Appliance Shell. Next enter your “root” credentials and login. Of course you can go back to the vCenter Appliance Main Screen using “ALT+F2”

Once you logged in. enter “Shell” command to go in bash shell.

Above command temporarily change the shell. Even at this stage you shell changed at appliance. But you still not able to use winscp client to copy the files at appliance.
To enable the scp access. You have to change the shell by using the below command at bash shell on vCenter appliance.
#chsh –s /bin/bash

Now try to acces the vCenter appliance using winscp and it should work as shown below.

By changing the shell using above command.Now every time when you logged it. you will directly login into bash shell.

If you want to change the shell back to appliance default from bash shell. Use the below command.
#chsh –s /bin/appliancesh

Option 2: From Shell
If you do not want to enable appliance bash shell from vCenter appliance using vSphere clients as I did in above steps.
Then Either you “SSH” on the appliance using putty, if you have already enabled it or press “ALT+F1” to access the appliance shell directory from appliance.
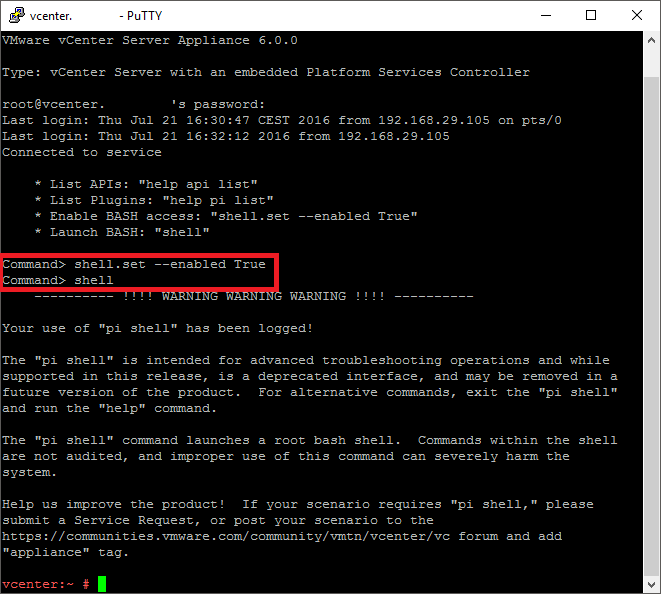
Run the below commands on vCenter Appliance Shell.
#shell.set –enable True

#Shell

Subscribe to:
Posts (Atom)
-
vmware converter – p2v – partition number must be set for the boot volume Leave a reply I was trying to archive old machine running R...
-
Configure PSC HA in vSphere 6.5 – Part 1 – Configuring Certificates PSC65-A.lab.local -- 192.168.1.211/24 PSC65-B.lab.local --...
-
 Link Here is an excerpt from the same blog: A World queue (a queue per virtual machine), an Adapter queue...